Google Analytics 4 Setup: Step-by-Step Guide
Setting up GA4 correctly is the foundation of every data-driven marketing strategy. Follow this beginner-friendly guide to configure GA4 step by step.

Google Analytics 4 (GA4) is the successor to Universal Analytics and works fundamentally differently. Where Universal Analytics revolved around sessions and pageviews, GA4 focuses on events and users. This might sound technical, but it offers enormous advantages, especially when you set it up correctly.
In this guide, we walk you through the complete GA4 installation process step by step. From creating your property to configuring conversions and linking to Google Ads.
Why GA4?
Before we begin, a brief overview of why GA4 is so important:
- GA4 is built privacy-first. It works with fewer cookies and has built-in consent mode support.
- It enables cross-platform tracking so you can track users across your website and app.
- The event-based model treats every interaction as an event, which is much more flexible.
- Built-in machine learning provides predictive audiences and insights without additional configuration.
- The free BigQuery integration lets you export raw data for advanced analyses.
Step 1: Create a GA4 Property
Go to Google Analytics
- Go to analytics.google.com
- Log in with your Google account (preferably use the account that also has access to Google Ads and Search Console)
- Click on Admin (the gear icon in the bottom left)
Create a New Property
- Click on Create Property
- Enter the property name (for example "Company Name - Website")
- Select your time zone (for Belgium: Brussels, GMT+1)
- Select your currency (EUR)
- Click on Next
Business Information
- Select your industry (choose the most relevant category)
- Select your company size
- Click on Next
Objectives
Select the goals that best suit your needs:
- Generate leads
- Drive online sales
- Increase brand awareness
- Analyze user behavior
This affects which default reports GA4 sets up for you.
Step 2: Create a Data Stream
A Data Stream is the connection between your website (or app) and GA4.
- Choose Web as the platform
- Enter your website URL (without https://)
- Give your stream a name (for example "Website - Production")
- Leave Enhanced Measurement enabled
Enhanced Measurement
This is one of GA4's major advantages. Without any additional code, GA4 automatically measures:
- Every page view
- Scrolls when someone reaches 90% of the page
- Outbound clicks to external websites
- Site search queries on your website
- Video engagement with embedded YouTube videos
- File downloads of PDFs, documents, etc.
- Form interactions with forms on your site
You can toggle these events individually on or off via the gear icon next to Enhanced Measurement.
Step 3: Install the Tracking Code
Now you need to place the GA4 code on your website. There are two methods, and we strongly recommend the second one.
Method 1: Directly via gtag.js
Google provides you with a piece of JavaScript code (the Google tag) that you need to place in the <head> of every page. This works but is limited in terms of flexibility.
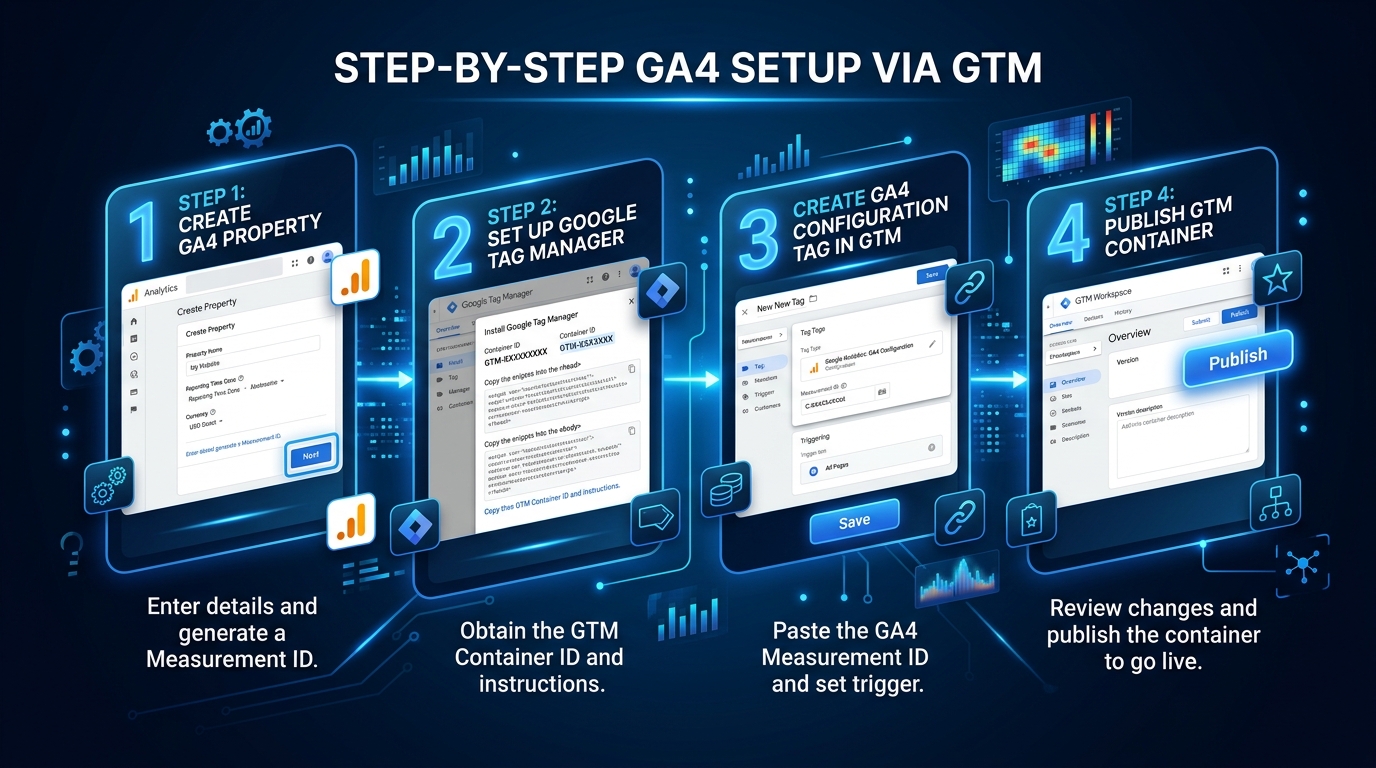
Method 2: Via Google Tag Manager (Recommended)
Google Tag Manager (GTM) is a free tool that lets you manage tracking codes without having to modify your website code every time.
Why GTM is the better choice:
- You can add and modify tags without a developer
- You can track custom events without code
- You have a preview mode for testing
- You keep all tracking in one place
Installing GTM:
- Go to tagmanager.google.com
- Create an account and container
- Place the two GTM snippets on your website (one in the
<head>, one after the<body>opening)
Adding GA4 Tag in GTM:
- Create a new Tag in GTM
- Choose Google Analytics: GA4 Configuration (or Google Tag in the latest version)
- Enter your Measurement ID (starts with G-, found in your GA4 data stream)
- Set the trigger to All Pages
- Save and publish your container

Step 4: Set Up Custom Events
Enhanced Measurement covers the basics, but for your business you'll likely want to track more specific actions.
Examples of Custom Events
- Form submitted: contact_form_submit
- Quote requested: quote_request
- Phone number clicked: phone_click
- WhatsApp message sent: whatsapp_click
- Product added to cart: add_to_cart
- Checkout started: begin_checkout
- Purchase completed: purchase
Creating Events via GTM
- Create a new Tag: GA4 Event
- Link it to your GA4 Configuration tag
- Give the event a name (use snake_case, for example: contact_form_submit)
- Optionally add event parameters (such as form_type, product_name)
- Set the correct trigger (for example: form submission, click on a specific element)
- Test via GTM's Preview mode
- Publish when everything works
Naming Conventions for Events
Stick to these rules for consistent data:
- Use snake_case: contact_form_submit, not ContactFormSubmit
- Be descriptive: purchase is better than event1
- Use Google's recommended events where possible (purchase, add_to_cart, sign_up, etc.)
- Maximum 40 characters per event name
Step 5: Configure Conversions
Not every event is a conversion. In GA4, you mark specific events as conversions.
How Do You Mark an Event as a Conversion?
- Go to Admin → Events (or Conversions in some views)
- You'll see a list of all events GA4 has received
- Toggle the Mark as conversion switch for the relevant events
Which Events Should You Mark as Conversions?
Focus on macro conversions, the actions that directly contribute to your business goal:
- Contact form submitted
- Quote requested
- Purchase completed
- Appointment scheduled
Micro conversions (such as a PDF download or video viewed) can also be tracked, but don't mark them as primary conversions. That clouds your data.
Assigning Conversion Values
For e-commerce, your website automatically sends the transaction value. For lead generation, you can assign an estimated value to each conversion. This helps later when calculating your ROAS in Google Ads.
Step 6: Link Google Ads
The connection between GA4 and Google Ads is essential if you're advertising.
Why Link?
- You can import conversions and use GA4 conversions as goals in your Google Ads campaigns
- You can share audiences by creating them in GA4 and using them for remarketing in Google Ads
- You can view campaign performance data directly in GA4
How Do You Link GA4 to Google Ads?
- Go to Admin → Product Links → Google Ads Links
- Click on Link
- Select your Google Ads account
- Enable Personalized Advertising (for remarketing)
- Enable Auto-tagging
- Click on Submit
Import Conversions in Google Ads
- Go to your Google Ads account
- Navigate to Goals → Conversions → Summary
- Click on New conversion action → Import
- Select Google Analytics 4 properties
- Choose the conversions you want to import
- Set the attribution model (data-driven is the default and recommended)
Step 7: Understanding Basic Reports
GA4 has a different reporting structure than Universal Analytics. Here are the key reports:
Realtime Report
See what's happening on your website right now. Perfect for checking whether your tracking works correctly after installation.
Acquisition Report
Where do your visitors come from?
- User acquisition shows the first visit of a user
- Traffic acquisition shows data per session, including returning visitors
Engagement Report
How do visitors interact with your website?
- Events shows all tracked events
- Conversions shows only the events you've marked as conversions
- Pages and screens shows which pages are viewed most
Monetization Report
For e-commerce: revenue, transactions, products, and more.
Retention Report
Do visitors return? How loyal is your audience?
Common Mistakes in GA4 Setup
Mistake 1: Double Tracking
If you have both the gtag.js code and a GTM tag running, you're counting everything double. Choose one method.
Mistake 2: Not Checking Enhanced Measurement
The default settings aren't always perfect for your situation. Check whether site search uses the correct parameter and whether form interactions work correctly.
Mistake 3: Not Setting Up Filters
Filter out internal traffic (your own IP addresses) and developer/staging traffic from your data. You do this via Admin → Data Streams → Configure Tag Settings → Define Internal Traffic.
Mistake 4: Not Adjusting Data Retention
By default, GA4 retains user data for only 2 months. Increase this to 14 months via Admin → Data Settings → Data Retention.
Mistake 5: Ignoring Consent Mode
In Belgium (and all of Europe), you're required to ask for consent before tracking. Implement a Consent Management Platform (CMP) and configure Google Consent Mode v2. Without this, you're missing data and risking fines under GDPR.
Next Steps
A correctly configured GA4 account is the foundation, but the real work begins after that. Think about:
- Custom dimensions and metrics for your specific KPIs
- Explorations for advanced analyses
- Lookalike audiences for your Google Ads campaigns
- Predictive audiences based on GA4's machine learning
Need help setting up or optimizing your GA4? At Saerens Advertising, we help businesses with a professional analytics setup that truly delivers insights. Request a free audit and we'll review together whether your data foundation is in order.
Related Articles

Need help with your marketing?
Request a free audit today and discover where you're missing opportunities.